
| mytem360 / information on the order contents | |
|
How to fill in required sections in each sub-order |

This guide presents step 2 of the mytem360 command setup:
The setup of the required and optional sections for each of the sub-order are available within the right-hand menu.
This guide is divided into 5 parts:
1. Each sub-order is available on the right-hand side, where you can view and modify its content (optional).
2. For each sub-order, you will have to fill in the required sections.
3. For each sub-order, you have the possibility to fill in the optional sections

4. Copy the information of a sub-order, once the first subcommand is completed.
5. Validate your order

1 - View and modify the contents of a sub-order (optional)
The menu on the right of the screen shows your sub-orders:

In this section you can:
- consult the content of each sub-order by clicking on the "configurations" link

- modify the content of each sub-order (depending on the offers proposed by your catalog and the compatibility with the sub-order to be modified):
-
-
- the length of the engagement
- a device or its color
- a package or an option ...
-
- Click on the product to be modified and follow the same procedure as seen previously in the "Complete the general information of the order" form https://saaswedo.zendesk.com/hc/en-us/articles/360053592151-Completing-general-information-on-orders
2 - Completing the mandatory sections
This part describes how to fill in the required fields of your sub-order.

a- Management group
1. Select the management group concerned for your sub-order by clicking in the "Management group" field (the list of management groups displayed is conditioned by the access you have on your login and the existing links with your order profile).
2. Click on Validate to go to the next step:

3. At each validated step, the dot on the banner turns green, the selected choice is indicated on the banner for confirmation.

b- Reseller/Provider
1. Choose a reseller for the current order:

2. Choose a reseller and the associated account and sub-account for the current order:

3.Submit your selection by clicking on Validate:

c- Sites (addresses)
1. Delivery site (delivery address)
Select a delivery site from the list of proposed sites by clicking in the "Assign a site" field (the proposed list is linked to the previously selected management group):


(after selecting your site, the general site information is displayed)

N.B.: If the order does not require the shipment of material (for example: opening of a line on a site in stock), this part will be grayed out because it is not necessary in this case. The billing site will be pre-filled.
If a delivery site is not present in the list of proposed sites, you can add it by clicking on the "Add a site" button:


2. Delivery instructions
You have the option to activate a delivery instructions insert. This part is optional.
The following information will be included in the order form to facilitate the delivery of the materials:
- phone number
- name
- first name
- instructions
If the insert is activated all the other fields will be optional apart from the phone number.

3. Delivery date
You can define a delivery date by activating the corresponding insert. This part is optional.

4. Billing address
If the billing address is the same as the delivery address, leave the following box unchecked:

If the billing address is different, check the box and choose your billing site:

As for the delivery address, the possibility of adding a site not yet defined is accessible via the "Add a site" button:

5. Validate your selections in the "Sites" section by clicking on Validate:

c- Email
1. Choose an action for the current order:

2. Recipient's email
- Choose the recipient's email to process your order from the list of available recipients.

- You can add one or more people in copy by clicking on "Add a recipient in copy", and then entering his email address:

3. Add an attachment
You have the possibility to add one or more attachments by clicking on "Add attachment":

The attachment can be added by drag and drop or by browsing in your operating system's browser.
Once the attachment is added, the file name and size will appear in the relevant field:

4. On the right hand side you will find a preview of the email that will be sent to the recipient(s). The email is conditioned according to the action selected previously for this order.

N.B.: The added attachment(s) will be proposed in this mail via a download link:

5. You can change the email message by indicating your personalized text in the "Mail content" box:

The email's preview will be done in real time, as you enter your text.
6. Validate your changes n the "Email" section by clicking on Validate :

The following items will now have been validated, signalled by the green check mark.

You will now have the option to:
- Further qualify your current sub-order by enabling the optional sections (See next part: Part 3 - Filling in the optional sections)
OR
- Move on to the next sub-order (See Part 4 - Copying information from a sub-order)
3 - Filling in the optional sections
This part describes how to fill in the optional sections of your sub-order.

Activate the desired sections with the toggle button on the right of the section:

a- Employees
Associate the articles of your sub-order with a collaborator by activating the Collaborators section using the toggle button.
You will have as many article/employee associations to make as quantities/configurations you have chosen.
Once the section is activated, you can also leave one or more configurations without associating a an employee to it.

CHOICE 1 : Associate an employee
Click on "Associatean employee" to associate an existing collaborator in the management group that you have previously selected when entering the mandatory elements.
Make your choice of collaborator in the list that appears, then validate by clicking on select :


Don't forget the possibility of deleting the association made if you want to modify the collaborator, by clicking on the following icon:

CHOICE 2 : Create an employee
Click on "Createn employee" to create an employee that does not exist in the selected management group and to associate an item to it:
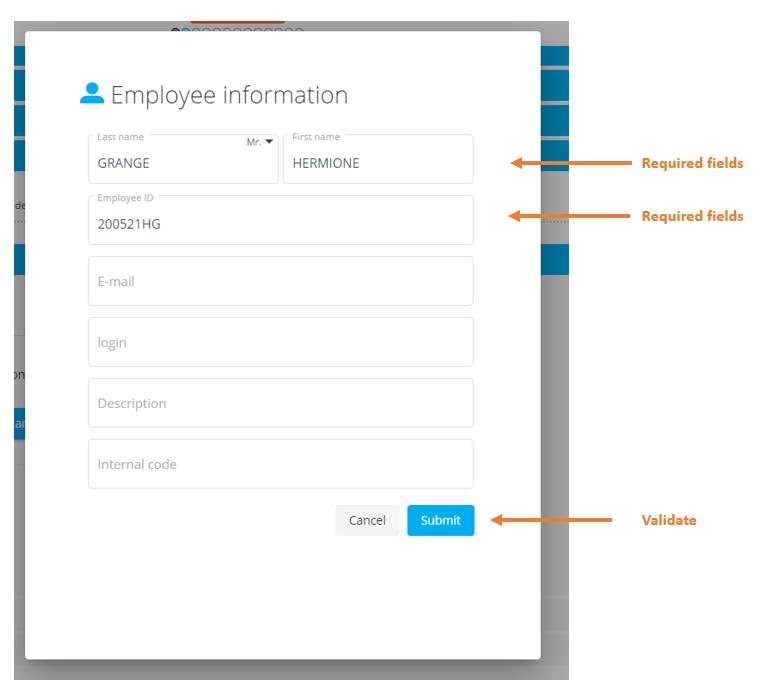
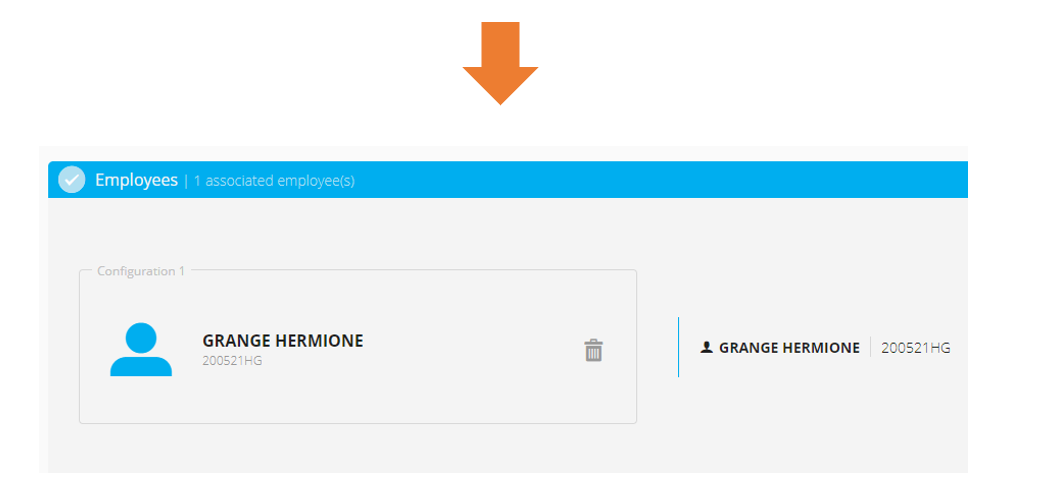
Validate your choices in the "Employees" section by clicking on Validate :

N.B.: It is possible to associate several configurations of a suborder with the same employee
b- Portability
Activate the Portability section ( -> 1.), then activate the configuration ( -> 2.) on which you want to perform portability:
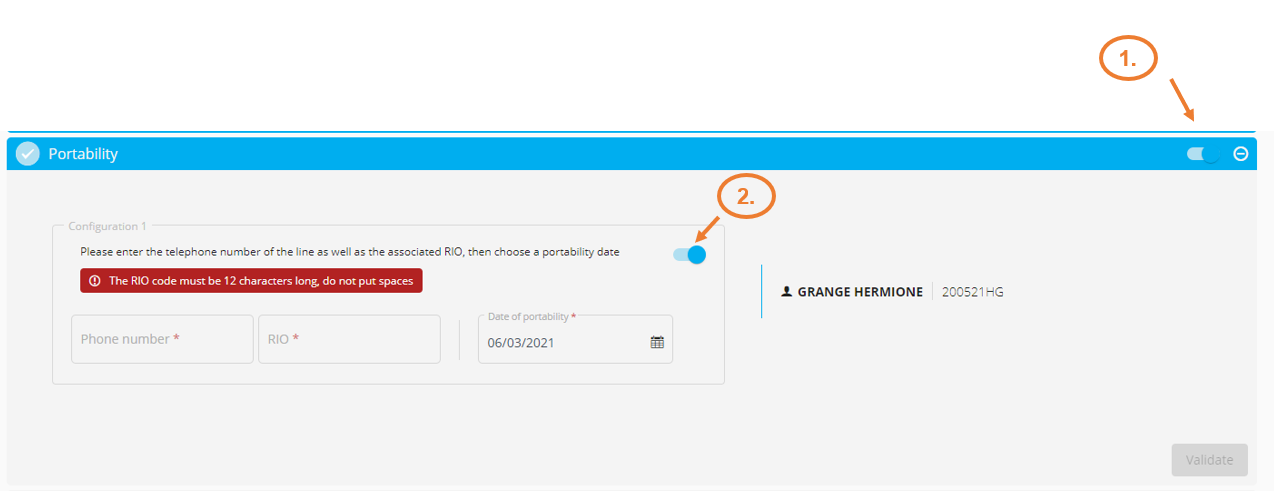
For each nominative association, the name of the user is indicated to identify each configuration.
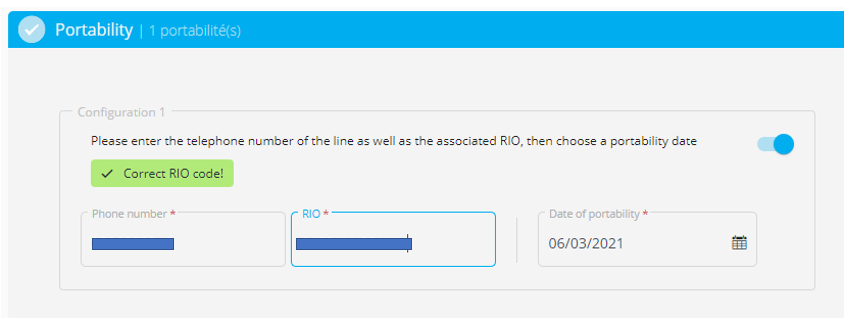
- Indicate the phone number, the RIO code and the portability date. The RIO code must be 12 characters long and must not contain any spaces. A check is made on the consistency of the couple line number / RIO.
c- Spare SIM
If your order includes the creation of a line and you wish to activate this line on a SIM card in your possession, activate the "Spare SIM" insert (1.) :
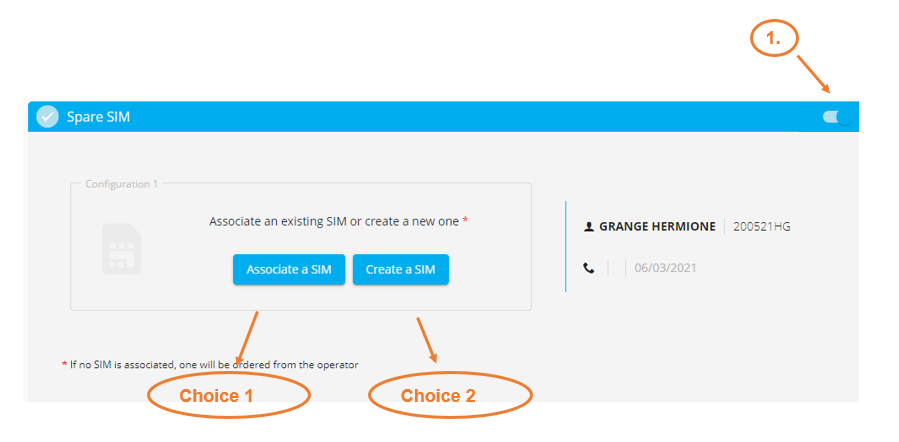
CHOICE 1
Associate an available and existing spare sim in the selected management group.

Select your sim card (1.) in the list that appears, then validate by clicking on Select (2.) :

CHOICE 2
Create a sim you own that is not present in mytem360.

Fill in the required fields in the new window, then validate:


N.B.: If no sim is associated with a configuration, one will be ordered from the operator.
Validate your choices in the "Spare sim" section by clicking on Validate :


Now you have possibility to:
- move to the next suborder (See Part 4 - Copying subcommand information)

If you do not have any other suborders to qualify, go to Part 5 - Validate your order.
4 - Copying information from a suborder
Now that suborder 1 has been completed, we will have to (if your order has more than one sub-order) fill in the information for sub-order 2.
At the top of the page, the progress bar has 1 circle per sub-order:

- The first one, finished, is in grey.
- The second one, in progress, is blue
- The rest to be completed are white.
To avoid having to enter the same information several times for each suborder, mytem360 offers the possibility to copy the contents of a suborder that has already been completed to another subcommand to be completed.
1. Click Copy Data to display the list of suborders whose parameters are eligible for copying.


2. Click on the suborder to be copied of your choice, then confirm:


3. The data has been copied except for the sections mentioned via the indicator 
The fields eligible for copying are pre-filled. All that remains is to fill in the fields that could not be copied due to incompatibility (supplier, distributor, etc.)
You also have the possibility to make any changes you deem necessary in the pre-filled fields.
5 - Validate your order
Once you have completed all your sub-orders, click on Execute order to validate it.


Your order is now validated, follow this link to track its progress via the order management grid:
https://saaswedo.zendesk.com/hc/en-us/articles/360054029611-Overview-of-order-management
Comments
0 comments
Article is closed for comments.